You are using an out of date browser. It may not display this or other websites correctly.
You should upgrade or use an alternative browser.
You should upgrade or use an alternative browser.
last things and other things.
- Thread starter joe1It
- Start date

IronPawn
Well-known member
- Messages
- 209
Beautiful stuff Joe... these type of exercises are essential in finding a style and drawing is fundamental in visual art (if we are searching for realism). This also reminds me of my old thread on the other forum, where I was set to do all "Bargue drawings", cover to cover... it took about two years for a good portion of them but lessons learned stayed to this day (highly recommended if you have time and patience for it). Keep on going.
All the best.
Zoran
All the best.
Zoran
Zen,Wayne,Zoran thanks very much for nice words.
Zoran,
yes I like realism. yes, I remember the beautiful post on Bargue, I had saved links among my favourites, some posts including those and some where I tried more artists or masters and other links that I liked to return to several times or go there. Bargue I tried only start sometimes. last time with digital looking for suitable digital brush and how to do it but I wasn't successful, I had found a digital example on YouTube but I didn't understand anyway. regardless of the medium I should try again.
thanks
IronPawn
Well-known member
- Messages
- 209
If you are into realism, then you should try it the "old fashioned" way. Print a copy, put it on a wall with a piece of paper next to it, at arms length distance (for A4 size), plumb line (I put a nail at the end of the red thread) and a knitting needle for angles. There is an app that can print larger images on A4 size sheet and you connect them with a tape because Bargue plates are quite large and, at the time, wanted to experience that on few drawings - but it is not necessary.Zen,Wayne,Zoran thanks very much for nice words.
Zoran,
yes I like realism. yes, I remember the beautiful post on Bargue, I had saved links among my favourites, some posts including those and some where I tried more artists or masters and other links that I liked to return to several times or go there. Bargue I tried only start sometimes. last time with digital looking for suitable digital brush and how to do it but I wasn't successful, I had found a digital example on YouTube but I didn't understand anyway. regardless of the medium I should try again.
thanks
Then you start making landmarks (first "envelope" to fit the image, then horizontals and verticals, angles, shadows, finally rendering) by eye only and then check with a "tool", for example you stretch a thread horizontally to make sure point on a Bargue is on level with your drawing... and you keep going. You can also measure a distance with a thread by placing your thumbs between 2 points but from my experience it works only on horizontals and verticals. It is a sight-size method. You can find a book online with all the steps, it is called Charles Bargue drawing course. It is a great way to exercise drawing and you can start seeing improvements withing couple of finished plates. Let me know if you need anything that I can be of help.
Zoran
Zoran ,Thanks very much, I have to look for that app,
of the sight to size method, I didn't understand where to hang the plate, on the wall in front of me, in front of me or on the wall to the side. and whoever draws from life, instead the person, or the still life, must stand facing me, and just a little to my right. also for the bargue sheet, then it must be attached to the wall in front of me. a little to the right (right, because, I draw with the right hand, in short, I have to place it side by side). I had a doubt because years ago I had bought DVDs which he explained this method, but you couldn't see where the subject or person was hanging, it seemed far away, very far to the right, at an angle. to measure I had taken some old hooks for working magic, but perhaps they were a little crooked, perhaps I had also taken a straight one, in any case then I had bought a lead and attached rope to it, then I didn't practice because 5 years ago I hit My back is against the wall and I feel tired in my dominant arm, even though after some time I had it checked and there seemed to be nothing, after a year however the discomfort has decreased and I have started drawing with it again. using pencils and more comfortable positions. regarding sight to size I signed up for a nice newsletter, Darren from SightSize.com. in the 9 years in which I have been drawing I have been using a table easel, A3, on analogue format I often used A4 or A5, for sight to size I sometimes put a book or sheet of paper next to it, but mostly I had the computer monitor in front of me and I could see on the monitor the reference, sometimes, often I try to draw, with the construction, the circle, as Loomis explained in the book or tutorial. however, the thing that I have always found very difficult, impossible in drawing, to do a good shading, shading is fundamental but really difficult and cleaning is also needed when preparing pencils as well as technique. 2 years ago the computer broke and I bought an iPad, I use an easel table with iPad on it, with iPad, I used sight to size more (sometimes I try without or I reduce or enlarge, many drawings instead with sight to size control based on height, or I do a mix with construction, digital I often try to use it as with paper but with these changes, checking more measurements), dividing the screen in 2, Bargue tried a couple of times, a newsletter had sent me a couple of Bargue tables with high dedication for printing, and I had found the book online, I bought another book, in addition to some paperbacks I bought used (I made a mistake because they reprinted it later and it is a large format book, my copy gives me allergies so I didn't copy the drawings but read the text and photographed part of it on its hatching) ) Pencil book, by Calle, her drawings are incredible, I haven't tried to copy them. I have a couple of digital attempts that I made on bargue but I deleted them from the iPad, saved on disk but without a name, but perhaps I have 2 on my phone and I can find them there. thank you for the help you have already given me and for the inspiration, sorry for this long answer.
of the sight to size method, I didn't understand where to hang the plate, on the wall in front of me, in front of me or on the wall to the side. and whoever draws from life, instead the person, or the still life, must stand facing me, and just a little to my right. also for the bargue sheet, then it must be attached to the wall in front of me. a little to the right (right, because, I draw with the right hand, in short, I have to place it side by side). I had a doubt because years ago I had bought DVDs which he explained this method, but you couldn't see where the subject or person was hanging, it seemed far away, very far to the right, at an angle. to measure I had taken some old hooks for working magic, but perhaps they were a little crooked, perhaps I had also taken a straight one, in any case then I had bought a lead and attached rope to it, then I didn't practice because 5 years ago I hit My back is against the wall and I feel tired in my dominant arm, even though after some time I had it checked and there seemed to be nothing, after a year however the discomfort has decreased and I have started drawing with it again. using pencils and more comfortable positions. regarding sight to size I signed up for a nice newsletter, Darren from SightSize.com. in the 9 years in which I have been drawing I have been using a table easel, A3, on analogue format I often used A4 or A5, for sight to size I sometimes put a book or sheet of paper next to it, but mostly I had the computer monitor in front of me and I could see on the monitor the reference, sometimes, often I try to draw, with the construction, the circle, as Loomis explained in the book or tutorial. however, the thing that I have always found very difficult, impossible in drawing, to do a good shading, shading is fundamental but really difficult and cleaning is also needed when preparing pencils as well as technique. 2 years ago the computer broke and I bought an iPad, I use an easel table with iPad on it, with iPad, I used sight to size more (sometimes I try without or I reduce or enlarge, many drawings instead with sight to size control based on height, or I do a mix with construction, digital I often try to use it as with paper but with these changes, checking more measurements), dividing the screen in 2, Bargue tried a couple of times, a newsletter had sent me a couple of Bargue tables with high dedication for printing, and I had found the book online, I bought another book, in addition to some paperbacks I bought used (I made a mistake because they reprinted it later and it is a large format book, my copy gives me allergies so I didn't copy the drawings but read the text and photographed part of it on its hatching) ) Pencil book, by Calle, her drawings are incredible, I haven't tried to copy them. I have a couple of digital attempts that I made on bargue but I deleted them from the iPad, saved on disk but without a name, but perhaps I have 2 on my phone and I can find them there. thank you for the help you have already given me and for the inspiration, sorry for this long answer.
IronPawn
Well-known member
- Messages
- 209
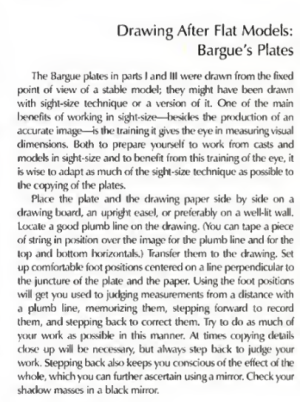
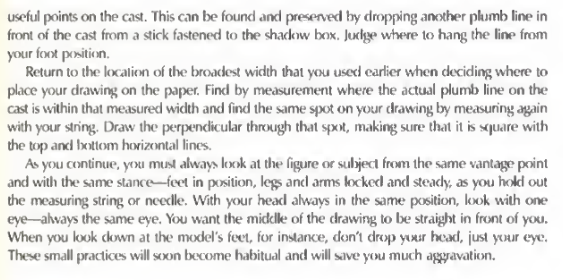
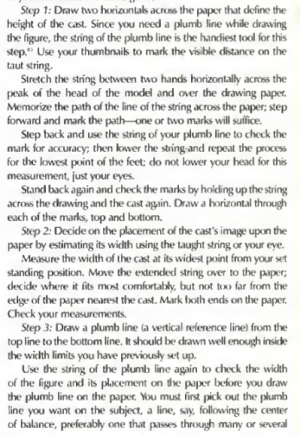
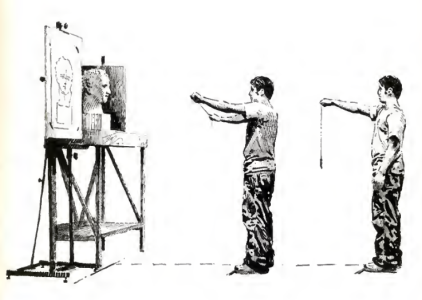
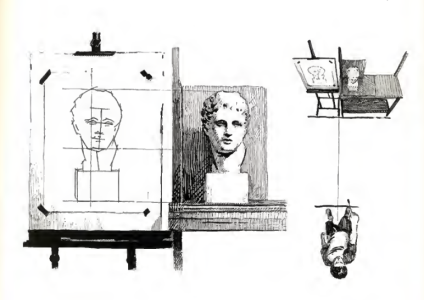
Hey Joe, no problem, I got it. I'll attach some images from a book to take a look at. Basically, image and paper is in front of you and you stand in the middle so you can glance from image to the paper. Same goes if you have a cast, or still life. As for rendering, all shadows start with flat single tone but transition into midtone is made more delicate. Here is a quick example *it doesn't look too good since I've been using a mouse, but you'll get an idea:


Look for classical order of light to get more idea of what I'm talking about.
Also, I'll try to attach images from a book on how to proceed.
Hope this helps.
Zoran
Look for classical order of light to get more idea of what I'm talking about.
Also, I'll try to attach images from a book on how to proceed.
Hope this helps.
Zoran
Attachments
I made these drawings, digital drawings.
I wanted to ask, are they like the previous ones or have I gotten worse?
I didn't draw for a while and in doing so I had difficulty with this and with my arm and shoulder which felt tired as had happened to me years ago after having collided, I hope just due to tiredness.


I wanted to ask, are they like the previous ones or have I gotten worse?
I didn't draw for a while and in doing so I had difficulty with this and with my arm and shoulder which felt tired as had happened to me years ago after having collided, I hope just due to tiredness.
Similar threads
J
- Replies
- 2
- Views
- 462
J