Hermes2020
Well-known member
- Messages
- 1,977
My workflow when I make a large concrete sculpture consists of two stages.
Stage 1. This is the artistic or creative part, in which I create the look of the sculpture and decide on the composition and other artistic aspects. I may use traditional drawing initially, but since sculpture is 3D, I prefer to use PC-based virtual sculpture tools to refine my ideas and generate a properly scaled 3D model. That way I can rotate it to view it from all angles on the monitor.
Stage 2. The second part is the execution of the sculpture, which involves implementing solutions to technical or engineering problems. On a large, heavy sculpture, it is extremely important to get the engineering right.
I will only tell you about Stage 2 at this time, because this is probably where most of the questions about the practicalities are. Please let me know if anyone is interested in Stage 1 and which software I use.
The concrete layers in the poolside sculpture were obtained in the final step of Stage 1, when I created the sculpture. The layers were numbered and saved as files to be printed on an A0 printer. The A0 printouts are 841 x 1189 mm, so some of the layers had to be printed on two sheets and joined. I put a reference 100 x 100 mm square on each sheet to ensure accurately scaled printouts. Here is an example.

The printouts were taped to a 16 mm MDF board, with 10 mm holes for bolts that ensured correct positioning of the embedded washers in each layer. Paper surface 3 mm foam board strips of 20 mm width were glued around the perimeter to create the walls of the mould. Wooden profiles were glued around the edges for support. The aligning bolts were then inserted before applying two coats of polyurethane varnish to the paper and the foam board.


The concrete mixture is supplied in 25 kg bags and has the correct ratio of aggregate and other proprietary ingredients pre-mixed at the factory, so only needs water to be added.
Before pouring in the concrete mix, 30 mm stainless steel washers with 10 mm holes were placed on the bolts, along with lengths of 3 mm copper rod to ensure secure anchoring and embedding in the concrete.


The washers were needed as secure gripping surfaces for the stainless steel nuts used to fasted the layers to the threaded rods.
Very rigid stainless steel mesh of 1 mm wire with 12 x 25 mm holes was used to reinforce the concrete.

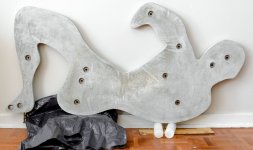
Brass rods (8 mm diameter) were embedded in some layers to serve as feet for the sculpture to rest on concrete discs on the surface next to the pool.
One of the completed slices. This one has two brass rod feet.


The Layers were assembled with 40 mm spacing between them.
I hope these details will be useful if anyone feels inclined to do something similar. Please feel free to ask me to clarify if I haven't explained anything well enough.
Stage 1. This is the artistic or creative part, in which I create the look of the sculpture and decide on the composition and other artistic aspects. I may use traditional drawing initially, but since sculpture is 3D, I prefer to use PC-based virtual sculpture tools to refine my ideas and generate a properly scaled 3D model. That way I can rotate it to view it from all angles on the monitor.
Stage 2. The second part is the execution of the sculpture, which involves implementing solutions to technical or engineering problems. On a large, heavy sculpture, it is extremely important to get the engineering right.
I will only tell you about Stage 2 at this time, because this is probably where most of the questions about the practicalities are. Please let me know if anyone is interested in Stage 1 and which software I use.
The concrete layers in the poolside sculpture were obtained in the final step of Stage 1, when I created the sculpture. The layers were numbered and saved as files to be printed on an A0 printer. The A0 printouts are 841 x 1189 mm, so some of the layers had to be printed on two sheets and joined. I put a reference 100 x 100 mm square on each sheet to ensure accurately scaled printouts. Here is an example.
The printouts were taped to a 16 mm MDF board, with 10 mm holes for bolts that ensured correct positioning of the embedded washers in each layer. Paper surface 3 mm foam board strips of 20 mm width were glued around the perimeter to create the walls of the mould. Wooden profiles were glued around the edges for support. The aligning bolts were then inserted before applying two coats of polyurethane varnish to the paper and the foam board.
The concrete mixture is supplied in 25 kg bags and has the correct ratio of aggregate and other proprietary ingredients pre-mixed at the factory, so only needs water to be added.
Before pouring in the concrete mix, 30 mm stainless steel washers with 10 mm holes were placed on the bolts, along with lengths of 3 mm copper rod to ensure secure anchoring and embedding in the concrete.
The washers were needed as secure gripping surfaces for the stainless steel nuts used to fasted the layers to the threaded rods.
Very rigid stainless steel mesh of 1 mm wire with 12 x 25 mm holes was used to reinforce the concrete.
Brass rods (8 mm diameter) were embedded in some layers to serve as feet for the sculpture to rest on concrete discs on the surface next to the pool.
One of the completed slices. This one has two brass rod feet.
The Layers were assembled with 40 mm spacing between them.
I hope these details will be useful if anyone feels inclined to do something similar. Please feel free to ask me to clarify if I haven't explained anything well enough.


")
